Difference between revisions of "How to make a Voodoo 2 SLI cable"
RacoonRider (talk | contribs) |
RacoonRider (talk | contribs) |
||
| Line 1: | Line 1: | ||
[[File:SLI_cable_pinout.jpg|200px|thumb|SLI cable pinout]] | [[File:SLI_cable_pinout.jpg|200px|thumb|SLI cable pinout]] | ||
| − | Two Voodoo 2 cards can succesfully run in SLI mode. During SLI mode, one card renders every even line of the screen, while the other card renders every odd line of the screen. This results in higher resolutions (up to 1024x768) with higher performance. To arrange an SLI setup you need two Voodoo 2 cards, 1 [[VGA passthrough cable]] and 1 SLI cable. SLI cables are not common and are quite hard to find. It's | + | Two Voodoo 2 cards can succesfully run in SLI mode. During SLI mode, one card renders every even line of the screen, while the other card renders every odd line of the screen. This results in higher resolutions (up to 1024x768) with higher performance. To arrange an SLI setup you need two Voodoo 2 cards, 1 [[VGA passthrough cable]] and 1 SLI cable. SLI cables are not common and are quite hard to find. |
| + | |||
| + | [[File:SLI_cable_opened.JPG|200px|thumb|left|SLI cable with lid removed]] | ||
| + | [[File:SLI_cable_result.JPG|200px|thumb|left|SLI cable - result]] | ||
| + | It's easy to make an SLI cable from FDD cable according to the pinout on the right: | ||
| + | *Open the lid with a knife. The plastic is very fragile, so do it very gently. You can see the configuration of the opened lid on the photo, it should be fairly easy to figure out what to do. | ||
| + | *Remove the connector and cut the cable. You can skip this step, but it surely makes the job more clean. It's a good idea to make your cable longer than the original SLI cable so that you would not be forced to use adjacent PCI slots. | ||
| + | *Find the pins 16,17,18,19. Notice that pin 1 is represented by a red line. Make two cuts and bend the cable, so that pin 16 on the cable is facing pin 19 on the conntector. | ||
| + | *Fit the cable inside the connector. Mind the lugs. Push it on the spiky pins as far as you can with your hand. Don't use a blade or a screwdriver of any sort, it might ruin the pins. | ||
| + | *Fit the lid. It won't close since the cable is not in it's position. Take a hammer and gently drive the lid inside the connector. | ||
| + | *If you have completed these steps the right way, the connector should look as if it was never opened in the first place. | ||
| + | |||
| + | |||
| + | ''Special thanks to vogons user '''Stojke''' for detailed and colorful representation of the pinout.'' | ||
''Note that in early driver versions it was not possible to combine two cards of different manufacturer or revision. If your setup does not detect SLI, first of all try using the newest drivers.'' | ''Note that in early driver versions it was not possible to combine two cards of different manufacturer or revision. If your setup does not detect SLI, first of all try using the newest drivers.'' | ||
Revision as of 18:43, 3 April 2013
Two Voodoo 2 cards can succesfully run in SLI mode. During SLI mode, one card renders every even line of the screen, while the other card renders every odd line of the screen. This results in higher resolutions (up to 1024x768) with higher performance. To arrange an SLI setup you need two Voodoo 2 cards, 1 VGA passthrough cable and 1 SLI cable. SLI cables are not common and are quite hard to find.
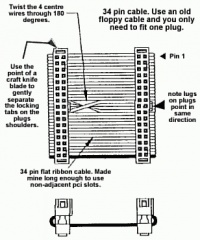
It's easy to make an SLI cable from FDD cable according to the pinout on the right:
- Open the lid with a knife. The plastic is very fragile, so do it very gently. You can see the configuration of the opened lid on the photo, it should be fairly easy to figure out what to do.
- Remove the connector and cut the cable. You can skip this step, but it surely makes the job more clean. It's a good idea to make your cable longer than the original SLI cable so that you would not be forced to use adjacent PCI slots.
- Find the pins 16,17,18,19. Notice that pin 1 is represented by a red line. Make two cuts and bend the cable, so that pin 16 on the cable is facing pin 19 on the conntector.
- Fit the cable inside the connector. Mind the lugs. Push it on the spiky pins as far as you can with your hand. Don't use a blade or a screwdriver of any sort, it might ruin the pins.
- Fit the lid. It won't close since the cable is not in it's position. Take a hammer and gently drive the lid inside the connector.
- If you have completed these steps the right way, the connector should look as if it was never opened in the first place.
Special thanks to vogons user Stojke for detailed and colorful representation of the pinout.
Note that in early driver versions it was not possible to combine two cards of different manufacturer or revision. If your setup does not detect SLI, first of all try using the newest drivers.


